Glen L Design 24 foot Hercules

Glen L Design 24 foot Hercules
"There is nothing--absolutely nothing - half so much worth doing as simply messing about in boats." - Kenneth Grahame, The Wind in the Willows

Friday, 3 February 2012

The Roof is off !!

Undoing someones hard work....

As previously mentioned, I wanted to modify the original design and open the boat up a bit more. To accommodate the changes I had to remove the drop roof from behind the wheel house. I looked at the task from all angles and put off the task until I felt I was doing the right thing.
Not the best sketch ... but you should get the idea

I marked a line and used the roof as a guide for the saw and cut from the inside. 

With some help from my son Charles we cut all around the perimeter and lifted the roof off

This is the result of the nights work . The next step was to eliminate the side & rear walls

The above photo shows the window section of the wheel house. 

Removing the window section of the wheel house was positively the hardest part of the job. I have left  50mm (2") which will bet the finished line for the new roof which will run all the way to cover the boat. This will keep the summer sun and winter rains of us.

The end result. The rear of the wheelhouse trimmed back and the two nib walls removed.

I have a little bit more cleaning up to do before I can start running the floor in and the new roof. The floor level will finish about 100mm (4") step down from the wheel house floor to accomodate a finished head room of 2m or a bit over 6' 5"


Sunday, 15 January 2012

Weekends Work


I have ordered my propshaft as the three I received with the boat were all too short. I hope to receive the shaft at the end of this week so I can resume that task. While I am waiting I decided to leap a step or two and work on some other areas. I have finished my Christmas holidays and now find work tends to get in the way of productive boat building, so I am back to after work and weekends .....

I had previously mentioned I want to change the roof line and run the floor at one level – To start this I have removed the side beds (as per plan) in the saloon and gut the remaining fixtures.

 Before removing built in beds

 After removing beds

While in demolition  mode I removed the kitchen the builder had fabricated in the wheel house and the hanging cupboard and sink in the forward cabin. My intention is to build a seat that will convert to a bed at night in the wheel house and to move the galley to the forward cabin. This will work OK and free up some space in the wheel house and saloon.

 Not a good photo of the previous galley - watch the movie and it will give an idea 
of how much space was taken up

Now the Wheel house will be a bit more practical with an 1.8m (6')day bed and the galley will be in the forward cabin that was just a bit small to fit a Vee birth

Already the boat has a more open feel about it and I am pleased with the results


Tuesday, 10 January 2012

Work begins on the boat ... finally

Now that I have got my "house" in order (Boat shed) and reasonably set up, I am tackling my first task ... the installation of the prop shaft. The boat has a 50mm (2") stainless tube laminated during the laying up of the keel. (This helps and I do not have to go through the process of marking out and boring the keel ... not a task I would look forward too!!) There is no strut with a whip strut and cutless bearing to worry about as the design  has the prop located behind the dead wood, so a simple stern bearing is all that is required
Sketch of the installation

Which method
Over the last week, I have been researching the web to find which stuffing box was the best answer and should I use a water lubricated or closed system that is grease lubricated. With some good advice from ol'mate Scott Noble and asome other advice, I have decided on a traditional self aligning  shaft log and the water lubricated method. I will introduce water from the engine cooling system to keep a positive flow of water which will keep the stern bearing lubricated and cool while in use. I will use a pillow block bearing to carry at the "top" of the shaft- this will help with engine alignment and carry the trust (fwd & rev).

All of that sorted ... lets get to work ...... To be continued.

This is interesting reading ... I came across this interesting post from http://www.pbase.com/mainecruising/stuffing_box&page=2

Why It Should Drip Some
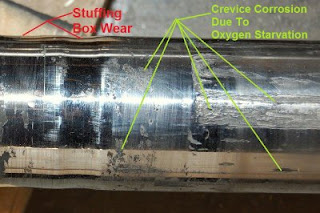
Real Tobin bronze shafting has been long gone for many years now and as such alloys in the stainless family such as Aqumet & Nitronic are now being used. These alloys, like type 304 and 316 SS can suffer from crevice corrosion. Crevice corrosion is worst when a stainless is in contact with seawater and also oxygen starved. This corrosion can happen between wet or leaking decks to chain plates or in keel stubs to the stainless keel bolts but many are unaware that it can happen to prop shafts too. Allowing the packing box to drip helps keep the water in the shaft log from becoming oxygen depleted.

Over the last 10-15 years there has been a dramatic rise in crevice corrosion of prop shafting. With the newer packing materials, and misleading advertising that use phrases like drip-less that cause DIY's to think it means "dripless" not drips less, owners have been starving the packing box area of oxygen by not allowing any fresh oxygenated water to pass through it. This can lead to the destruction of your prop shafting from crevice corrosion. While some packings such as Gore GFO, Ultra-X or GTU may be able to be adjusted to be mostly dry and still some what cool to the touch it is still a bad idea from a crevice corrosion stand point.
Another pit fall when a stuffing box is run totally sealed and "drip free" they can begin to trap air up in the shaft log. All it takes is a quick blast of reverse, and the resulting cavitation bubbles forced up and in, or after sailing in rough weather. Once enough air becomes trapped up in the shaft log the packing box you thought was cool to the touch begins cooking while you least expect it. Even PSS has now moved to selling all their drip less packing boxes with an air vent.
If a stuffing box is allowed to drip it allows for excellent cooling, longer shaft life, less opportunity for crevice corrosion and less opportunity for trapped air to run the box totally dry and cook it.


Simple Answer: I fit a traditional floating shaft log with conventional packing and allow the gentle drip. Below the log I will fabricate a contained area with a small bilge pump and a float switch .... nothing like belt and braces !!!!!

Sunday, 8 January 2012

Extensions .....

Once I had the boat inside my tempory shelter, I realised I was a bit cramped and had no room for my table .... so the only answer was to extend. My son Charles helped me construct a simple frame which we have covered with Poly tarp to provide a waterproof solution
We also constructed a platform which marries up with the transom to gain access through the transom to the boat. We used simple cheap pine for the frame and a transport pallet for the deck. I had som 600mm (2 foot) wide pine planks which I used for the stringers of the stairs ... this provided a challenge as they had considerable warp to them.

So now I have a platform with some storage and bench space and stairs to gain access, all I need is to complete some storage racks for timber, boat bits etc and I can rip into it

 One morning John noticed something floating towards the deserted island that had become his home 
since the ship sank six months ago.

As the object came closer, he realized that it was a large barrel. He very soon thereafter realized that hanging on to the barrel was a very scantily clad woman. 
In fact she was the most beautiful woman he had ever seen.

Arriving on shore the woman left the barrel and slowly and suggestively walked towards John. 
She whispered into John's ear, " I have something you want!"

John broke into a dead run towards to breaking waves yelling, 
"Don't tell me you've got beer in that barrel!"

Thursday, 5 January 2012

Design thoughts

Now that the boat is undercover in its new home, I have had some time to assess the layout of the boat, what has been completed and start making some lists of what has to be done so I can sort them into some sort of order.

While compiling the list and poking around in the boat, something occured to me rapidly ... The notion of spending my days on the water stepping up and down from the wheel house to the saloon, then stepping up again to the cockpit has "whiskers" on it. 

I am sure the stepped saloon was to help create the tug/trawler theme and it is certainly a good looking craft, but being a gentlemen of large proportions I am about to exercise some artistic licence and introduce some design changes


My aim is to maintain the floor level of the wheel house and step down about 100mm (4'' for or frends in the States) to the same level as the cockpit floor and maintatin the same floor level right through. I will have to lift the roof to either flow on from the wheel hose roof or sit below it (like the sketch)

The photo above is from the Glen L Hercules site, built by Escondido Christian Reform Church. This is a nice looking Hercules and I like the design (I would be intersted if this was the original 24' or has it been stretched?)............ though I am tossing up ideas on the roofline, but I would like to follow theroof through over the cockpit .... It gets pretty hot in the summer and I would like to shelter from the sun and rain. I am governed a bit by the existing wheel house and window layout, but would like to achieve something similar

I am interested on your thoughts or feedback

 Nautical Lingo

The Steamboat Captain brought his son along on a short cruise upriver to show him what he does for a living. All the kid wanted to do was steer the boat. Insisting that his father taught him enough to handle the job he asked the pilot to let him take the helm.
"Okay", said the pilot, "but you must pass a small test first.
If I asked you to turn to the left, what nautical term should I use?" "Turn to Port", said the boy. "Correct", said the pilot.
"If I wanted you to turn the boat to the right, what direction would that be?" "Starboard", said boy grinning from ear to ear. "Good for you", said the pilot.
"And straight?" asked the pilot. The boy quickly replied, "Without ice."

Monday, 2 January 2012

Engine - Thornycroft


 I have purchased a Thornycroft marine diesel for Tangaroa. I had mentioned that the boat came with an Isuzu 4FB1 diesel which was not marinised and a Borg Warner Velvet Drive which was not connected - I figured Ebay would come to the rescue and sure enough I purchased a Thornycroft D1757 complete with gearbox and Bowman heat exchanger. To the best of my research so far the motor is a BMC (Leyland) diesel of about 36hp to 44hp.

Any help with information on this model would be appreciated

I have not fired it up yet but plan to do that over the next day or so. The oil looks good ... so here is hoping. I was pleased to find an AC compressor mounted as the boat has a Eutectic refrigerator  already fitted.

I guess it would be prudent to fit new hoses and belts and give the engine and box an oil change before fitting.

I now have to devise a plan to get this engine into the boat and on its bearers - not a simple task ... open to an advice or past experiences


Why The Name Tangaroa ?


Photo by Hellnbak - http://www.flickr.com/photos/31475199@N06/with/2945566007/

The first Tangaroa was a Red Jacket 18' trailer sailer which had a fixed keel.... This was a restoration project and we had so much fun and sailed all over Port Stephens and The Myall Lakes. So when cosidering a name for this boat, the choice was obvious. 

 The original Tangaroa taken about 1995
 
There was almost another boat to be blessed with the name Tangaroa II .... but that is a sad story and like all sad love stories, does not need to be repeated ....... So here we have the background on Tangoroa

In Māori mythology, Tangaroa (also Takaroa) is one of the great gods, the god of the sea. He is a son of Ranginui and Papatuanuku, Sky and Earth. After he joins his brothers Rongo, Tūmatauenga, Haumia, and Tane in the forcible separation of their parents, he is attacked by his brother Tawhirimatea, the god of storms, and forced to hide in the sea.[1] Tangaroa is the father of many sea creatures. Tangaroa's son, Punga, has two children, Ikatere, the ancestor of fish, and Tu-te-wehiwehi (or Tu-te-wanawana), the ancestor of reptiles. Terrified by Tawhirimatea’s onslaught, the fish seek shelter in the sea, and the reptiles in the forests. Ever since, Tangaroa has held a grudge with Tāne, the god of forests, because he offers refuge to his runaway children (Grey 1971:1–5).

The contention between Tangaroa and Tāne, the father of birds, trees, and humans, is an indication that the Māori thought of the ocean and the land as opposed realms. When people go out to sea to fish or to travel, they are in effect representatives of Tāne entering the realm of Tāne's enemy. For this reason, it was important that offerings were made to Tangaroa before any such expedition (Orbell 1998:146-147).

Another version of the origin of Tangaroa maintains that he is the son of Temoretu, and that Papa is his wife. Papa commits adultery with Rangi while Tangaroa is away, and in the resulting battle Tangaroa’s spear pierces Rangi through both his thighs. Papa then marries Rangi (White 1887–1891, I:22-23).

In another legend, Tangaroa marries Te Anu-matao (chilling cold). They are the parents of the gods ‘of the fish class’, including Te Whata-uira-a-Tangawa, Te Whatukura, Poutini, and Te Pounamu (Shortland 1882:17). In some versions, Tangaroa has a son, Tinirau, and nine daughters (1891:463). As Tangaroa-whakamau-tai he exercises control over the tides.


 - Thanks Wikipedia

So thats the history behind the Maori version of the name 

Tangaroa II's new "house" at Medowie Marina

Today my mate called in to fabricate a tow hitch for the slip trailer. He has done a great job and now I can move the boat around easier. I was lucky he has all his gear in the back of his truck so fabricating down the back yard was not a problem.
Griffo working outside in the paddock

Once the hitch was completed, I decided it was time to put the boat in its new "house". With the help of the trusty Nissan ....  All went smoothly ....... Now Tangaroa is out of the weather and the real work can begin

A great day was had by all.

Sunday, 1 January 2012


Boat Specifications
Length overall 24'-1"
Length waterline 22'-0"
Beam 8'-0"
Hull draft 24"
Displacement 5532 lbs.
Hull weight (approx.) 1600 lbs.
Hull depth 6'-9"
Freeboard forward 5'-0"
Freeboard aft 3'-2"
Height overall 10'-10"
Headroom 6' to 6'-6"
Cockpit size 4'-3" x 6'
Cockpit depth 32"
Fuel capacity 80 gals.
Fresh water capacity 40 gals.


Hull type: Semi-displacement, hard chine hull with practical cruising speed of 7 knots, and a maximum hull speed of approx. 9 knots. Bottom design features bulbous forefoot with a reverse curve at the chine. Double diagonally planked to a total thickness of 1/2". Topsides planked with sheet plywood to a total thickness of 3/8". Carvel planking or other conventional types are optional but not detailed in the plans.
Power: Single centrally mounted diesel or gasoline inboard; 

Boat Shed -"Medowie Marina"

I figured I needed to keep the boat (and me) out of the weather while I weaved my magic. I have constructed a simple pipe frame and pulled a large tarp tight over the frame. Sounds low tech .... because it is! ........... I hope to get 12 months out of the tarp.

Thanks to Scott Jones, Bernie and Jaye Powell for their help and muscles

The shelter is 8.5 metres long by 3.8metres wide and 3.6 metres to the eave. The boat is 3.3metres siting on the slip trailer so I should have plenty of room to move around to work on the boat. I have backed on to my existing Garage so I have power and light at hand. 

I will post more photos as I fit out my "Boat Shed"

Welcome to my Blog

Welcome
I would like to share my journey with you as I complete this project. I am sure there will be some interesting times ahead and I hope you will be interested enough to share with me.

I have recently purchased this 70% completed Glen L - Ken Hankinson design Hercules Trawler Tug. Have a look at this link http://www.glen-l.com/designs/cruiser/hercules.html

The boat build had remained static for some years and never been completed so therefore has not made it to the water.

This photo shows the boat the day it arrived at my house.
I had it transported by tilt tray which was easy as it came with the slip trailer

I bought the boat from a Col at Martins Creek. He was unsure of the history of the boat other than he had purchased it from Morpeth. The boat came with 3 box trailer loads of bits and piesces including tanks, steering gear, bollards ... the list goes on. Some bits and pieces were new but it appears someone had collected a lot of the fittings from a donar boat (which must have been maroon in colour). Suits me fine .... I like the idea of recycling

Included was an Isuzu 4FB1 Diesel which had not yet been marinised and a  Borg Warner Velvet Drive AS2-72N wit 1-1. The box and motor were seperate items so made the decision to post them on Ebay and seek a suitable motor/gearbox combination